Tuesday, October 29, 2013

Brio Tuscan Grille - Winter Park

When we lived in Pittsburgh, in my gluten-eating days, my husband and I ate at a restaurant called Bravo two or three times a month. Brio and Bravo are part of the same restaurant group and have very similar menus.  My initial experience at the Brio in The Mall at Millenia was not good.  Years ago, they did not have a gluten free menu and seemed very reluctant to serve me anything but plain chicken on a salad with oil and vinegar.  After spending about 20 minutes going round and round with the server and having a mediocre meal, I did not go back for several years. 


Imagine my surprise when I visited the Brio in Winter Park last year and learned that they had a gluten free menu and were serving gluten free pasta!  The best part, one of my favorite pasta dishes was on that menu. 


Pasta Brio is Schar gluten free penne with chicken, seared mushrooms, and a red pepper sauce.  I absolutely love this dish!  The red pepper sauce is so flavorful that I rarely have to ask for extra Parmesan cheese.  Their gluten free pasta is always cooked consistently well at the Brio location in Winter Park.  If you live near a Bravo instead of a Brio, this dish is also on their gluten free menu and is called Pasta Bravo.  You can find their locations here


Another favorite of mine at Brio is the Pasta Primavera with gluten free penne, mushrooms, spinach, Roma tomatoes, garlic, and feta cheese.  This is a much lighter dish than the Pasta Brio, but I always have to ask my server to grate Parmesan cheese on top to give it a little more flavor.  With the Parmesan on top, it is just perfect! 


If you go to Brio, make sure to get a MyBrio rewards card or the myBrio Rewards App.  It's free, and when you register for the MyBrio Loyalty Program, a complimentary appetizer will be loaded onto your card.  You will also receive a special birthday reward and random rewards throughout the year.  I recently received a buy one entree, get one half off reward.  You can check out all the perks here

As far as the rest of the gluten free menu goes, I have tried the Pasta Pomodoro, the Chicken Griglia, the Brio Chopped Salad, and the Salmon Griglia Salad.  They are all great choices too.  My entire extended family has always loved Bravo and Brio because they have consistently excellent food.

I have been back to the Brio at The Mall at Millenia and had great meals.  I appreciate that Brio and Bravo have made the effort to create such a great Gluten Free Menu.

Hopefully, at some point in the future, they will offer gluten free bread and a gluten free dessert choice.  A girl can dream.  :-)

November 26, 2013 Update


I was very surprised when my pasta primavera arrived tonight.  Every time I have eaten at Brio, I have been served penne, not fusilli.  Our waitress brought over the chef who explained to me that they are now using Barilla gluten free pasta.  The pasta was not al dente, and I didn't enjoy the consistency.  Barilla makes excellent gluten free pasta, so my fusilli must have been cooked way too long.  My pasta was also quite tasteless, even with the addition of a large amount of Parmesan cheese.  Previously, I have enjoyed every meal I have had at Brio since they added a gluten free menu.  Tonight, I was disappointed in both the long, long wait for our food in a nearly empty restaurant, and the quality of my meal.

April 17, 2014 Update - Today, my daughters turned nine!  It's also the day we got back from our 5th cruise on the Disney Dream.  My husband and I were tired and didn't feel like cooking, and the girls wanted pasta, so we decided to go to Brio.  After four days of heavy eating, I decided to order the Salmon Griglia Salad, which is described as mixed greens with Roma tomatoes, asparagus, feta, and a lemon vinaigrette.  I substituted cucumbers and olives for the asparagus tonight.  I loved everything about this salad.  It was a nice light meal, the salmon was fresh tasting and perfectly cooked, and I enjoyed the feta, dressing & vegetables.  


April 10, 2015 Update

Tonight, we had dinner at the Brio in Winter Park.  I was in the mood for fish, so I ordered the grilled salmon with lemon caper butter sauce, roasted vegetables, and mashed potatoes.  The vegetables and fish were seasoned and cooked well, and the mashed potatoes were good. 


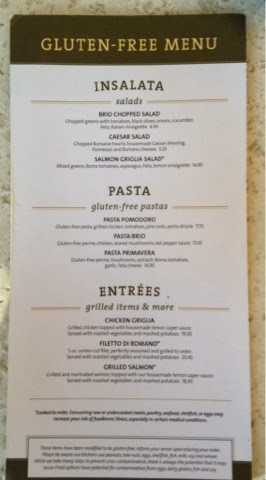
The gluten free menu at Brio includes the following dishes:

Salads - Brio chopped salad, Caesar salad, Salmon griglia salad

Pasta - Pasta Pomodoro, Pasta Brio, Pasta Primavera

From the Grille - chicken griglia, grilled salmon, 5 oz filet

When I came home tonight, I saw the following warning on their menu, which I had taken a picture of:  Brio foods that are labeled Gluten Free are prepared in a common kitchen with the risk of gluten exposure.  Therefore, Brio DOES NOT recommend these items for guests with celiac disease.  Guests with gluten sensitivities should exercise judgment in consuming those foods.

I understand that restaurants are trying to protect themselves from legal action by putting statements like this on their menus, but I don't like seeing them, and I tend to avoid restaurants that say they are not safe for celiacs.  Even Disney has disclaimers about their food being prepared in shared kitchens on their gluten free menus, but they don't warn celiacs away.

What are your favorite gluten free dishes at Brio?  


Monday, October 28, 2013

NuGo Dark Review & Giveaway

Update - the giveaway is now over

About a week ago, my father-in-law told me about the NuGo Dark bars that he had been eating.  Because of his recommendation, I decided to buy one when I was at The Fresh Market.  On the packaging, it says that they contain 10g of non-GMO protein and are certified gluten free, vegan, and pareve. I was really surprised how much I liked the NuGo Dark Mocha Chocolate bar that I had purchased, because I am usually not a fan of dark chocolate.  It had a great taste and I loved the texture of the non-GMO soy crisps.  I posted a picture of the NuGo Dark Mocha Chocolate bar that I had purchased on my Gluten Free in Orlando Facebook page, and asked if anyone had tried them.  After someone mentioned that there was a chocolate pretzel with sea salt bar, I knew I had to try it.


At Whole Foods, I bought the other bars in the NuGo Dark line - Chocolate Pretzel with Sea Salt, Chocolate Chocolate Chip, Peanut Butter Cup, and Mint Chocolate Chip.  My two personal favorites are the chocolate chocolate chip and the chocolate pretzel with sea salt, which is amazing!  It's the perfect blend of salty, sweet, and crunchy!  I have been looking for healthier alternatives for my daughters for school this year, so I asked them if they would like to take one to school.  I cut them in half so they could have part of a bar for snack, and part for a lunch treat because they are about 200 calories each.  I have enjoyed them before my morning workout, as a snack after my workout to get me through to lunch, and as a lunch treat.

Not only do I love the taste of NuGo Dark, but they also happen to be made in a little town called Oakmont, that is about 10 minutes away from where I lived in Pittsburgh. It's great to be buying a product from our hometown!


I love this statement from NuGo's website - Our decadent NuGo Dark bars use real cacao dark chocolate to enrobe our bars. Cacao is a natural source of flavonol antioxidants which help neutralize free radicals and protect your body from cell damage while tasting delicious. Real Dark Chocolate uses all the properties of the cocoa bean, including natural chocolate and cocoa butter. Cocoa butter is important because it can reduce inflammation and lower blood pressure; vegetable fat alternatives used by other companies do not carry these health benefits. Our dark chocolate protein bars prove: Delicious has a dark side. 


NuGo is very passionate about dark chocolate food labeling.  They are petitioning the United States Food & Drug Administration on change.org.  

"The FDA has not set a standard of identity for dark chocolate even though there are FDA standards for milk chocolate and white chocolate. Consumers are being deceived into thinking they are eating healthy dark chocolate, while actually consuming fake chocolate made from vegetable fats (usually palm oil). Without a standard of identity, companies can label a product ‘dark chocolate’ on the front of a package without using real dark chocolate ingredients!"  You can check out and sign their petition here.  


We also recently purchased some of the NuGo Slim bars at Whole Foods.  With only 2 or 3 grams of sugar, these bars pack a protein punch with a whopping 15 to 17 grams of protein, and 7 grams of fiber.  They are certified gluten free, and contain no maltitol or artificial sweeteners. 

January 8, 2014


NuGo recently sent me their newest NuGo Dark bars to try.  My husband ate the chocolate coconut, because I don't eat coconut.  He liked it, but he said it wasn't his favorite NuGo dark bar.  This week, I tried the spicy chocolate with chili peppers, which might be my new favorite NuGo bar.  I loved its spicy kick, and the slight hint of cinnamon.  I will definitely be looking for this bar at local stores.  

So, would you like to win one mixed box (12 bars) of NuGo Dark?

How it works:   

Each person can be entered into this contest 14 times via Rafflecopter.   

One winner will be picked randomly, via Rafflecopter, based on valid entries. 

This giveaway is only open to people living in the continental United States.   

The winner will appear here when the giveaway ends and will be contacted by me.  If the winner does not respond within 48 hours, a new winner will be chosen.  Winner -- Amber Bowman

The opinions contained within this review are entirely my own.  I did not receive any free product from NuGo Nutrition until the January 8th update, and I approached them about sponsoring a giveaway. 

a Rafflecopter giveaway


Sunday, October 27, 2013

Queen's Three Bean Soup with Gluten Free Hard Cider Cranberry & Sage Bread

My daughters came up with the name for this soup because their grandmother gave me the recipe, and they call my mom Queen.....long story. Another suggestion was Queenie's 3 Beanie Soup.  :-)


After having lunch at the Epcot Food & Wine Festival, we stopped at The Fresh Market to pick up some ingredients for the soup.  My mom used cannellini, black, and red kidney beans when she made this soup.  I decided to use pinto beans instead of black beans, which are not my favorite in soups. 


I always used to buy peppercorns to grind my own pepper, but I love Tellicherry Coarse Grind Black Pepper from Penzeys Spices.  It's easier for measuring purposes, and provides me with a more consistent grind than my temperamental pepper mill.  In Orlando, there is a Penzeys Spices store in Winter Park. 


My mom told me that she used a cup of small bow tie pasta in her soup.  I decided to use the new BiAglut Fusilli I had purchased from amazon.  Knowing how much my daughters love pasta, I cooked two cups.  Next time, I might cook three.  My girls wanted more, of course.  


My mother cooked her pasta right in her soup.  I decided to cook mine separately and add it in at the end.  Even though BiAglut behaves like a wheat-filled pasta and doesn't need a cold rinse, I was hesitant to cook it in the soup. 


Here's a better look at Queen's Three Bean Soup before I added a good amount of grated Parmesan and a drizzle of olive oil. 

Queen's Three Bean Soup

Ingredients

1/2 large sweet onion -- diced
1 T olive oil
3 cloves of garlic -- minced
4 C (1 quart) gluten free chicken stock
1 can Cannellini Beans -- do not drain or rinse
1 can Pinto Beans -- rinsed
1 can dark red Kidney Beans -- rinsed
1 can San Marzano crushed tomatoes (14.5 ounces) or a 10 ounce bag of fresh San Marzano tomatoes (diced)
1 tsp kosher salt
1/2 tsp thyme
1/2 tsp oregano 
1/2 tsp dried basil
1/4 tsp coarse ground black pepper
2 or 3 C of uncooked pasta
Grated Parmesan or Romano cheese -- to taste
Extra virgin olive oil for garnish

Directions

Cook the onion in your soup pot over medium heat in 1T of olive oil until it begins to soften.  Add the garlic, stirring constantly for a minute or two until it begins to brown.  Add your chicken stock, beans, tomatoes, salt, thyme, oregano, basil, and pepper.  Bring the soup to a boil over high heat, then turn your burner to low and put a lid on your pot.  Simmer for 20 minutes. 

While the soup is simmering, cook your pasta according to package directions.  

Before serving, add the pasta to the soup.  Garnish each bowl with grated Parmesan/Romano cheese and a drizzle of extra virgin olive oil.  

Serves 4 to 6

October 29, 2013 Update

My family liked this soup so much on Saturday, I decided to make it for dinner again tonight.  I needed a dinner that I could prepare ahead of time because of my daughters' after-school schedule.  When I made the soup the first time, I didn't know how long my mom cooked it for.  She later told me that she usually cooks it in the early afternoon for about 30 to 40 minutes, then lets it sit on the stove until dinner time, when she reheats it.  My mom feels that it is more flavorful this way.  If you are pressed for time, you really can prepare this soup in 30  minutes using my previous directions.  It's also a great make-ahead dinner. 


After reading a disturbing article about BPA and canned tomatoes, I decided to use fresh San Marzano tomatoes tonight.  I diced a 10 ounce bag of San Marzano tomatoes and was very happy with the results.  I also added a 1/2 tsp of dried basil.  I updated the recipe with these changes. 


Tonight, I took a picture of my soup loaded up with Parmesan.  Buy the good stuff!  I purchase my Parmesan and Romano from the cheese section in Whole Foods.  This time, I used about 3 1/2 cups of pasta.  It was the perfect amount for us.  I like a lot of "stuff" in my soup and not a lot of broth. 


My mom gave me a bottle of her favorite olive oil when we were in Hilton Head.  She always has my aunt bring her down a case from Pittsburgh.  It's from the ultimate Italian Store -- Penn Mac in the Strip District.  I finished my soup off with a drizzle of this very flavorful extra virgin olive oil.  It was amazing! 

November 10, 2013 Update -- 5 Bean Soup

Today,  I decided to make a larger quantity of soup because I had 1/2 a container of chicken stock left over from making White Chicken Chili last weekend.  I couldn't let that go to waste!  


I used 6 cups of chicken stock, 5 cans of beans (cannellini, Great Northern, black, pinto, and dark red kidney), one medium sweet onion, extra spices (about 1 1/2 times the amount called for in the original recipe), 4 cups of gluten free fusilli, 4 cloves of garlic (2 tsp minced garlic), and a bag and a half of fresh San Marzano tomatoes (15 ounces). My husband declared it to be his favorite soup, and my girls devoured it, only pausing occasionally to ask for more cheese.  :-)

Gluten Free Hard Cider Cranberry & Sage Bread

I love to make Gluten Free on a Shoestring's Herb Beer Bread.  I usually use fresh basil instead of oregano in the recipe because my daughters were not huge fans of the oregano.  Today, I decided to mix things up a bit. 


I used hard apple cider instead of gluten free beer.  Total Wine has a great selection of gluten free beers and ciders.  Most hard ciders in the store are marked gluten free. 


One of Nicole's readers talked about using hard cider and sage, and I thought that sounded like a great combination.  I also decided that in the spirit of fall, I wanted to add some dried cranberries.


Another little experiment -- I used my muffin pans instead of my ceramic bread pan.  It was easy to freeze the leftovers.  


After only 15 minutes in the oven, I had 12 little hard cider cranberry and sage breads. 


I thought I was going to have to listen to whining from my daughters about the cranberries, but with a little bit of butter, they gobbled them down without a complaint.  I will definitely be making this recipe again, both ways.

Products used -- I used Better Batter Gluten Free Flour, Crispin Hard Apple Cider, 1/2 C of certified gluten free sliced cranberries (chopped) from Nuts.com, and Raw Organic Whey from amazon.com.

I also used 3T of fresh sage (chopped) instead of the oregano called for in the recipe. 


Thursday, October 24, 2013

Roasted Fingerling Potato and Tomato Salad with Feta & Green Beans


When I called my mother yesterday, she told me about this amazing side dish with roasted fingerling potatoes and feta that she had made the night before.  I decided I wanted to make it and headed out to The Fresh Market to pick up everything I needed for dinner. 


Before I picked up my daughters from school, I put together a dressing of extra virgin olive oil, lemon juice, fresh basil, white balsamic vinegar, garlic, and coarse ground black pepper.


My favorite fingerling potatoes are the Russian Banana variety.  I purchase them at The Fresh Market or Whole Food. 


After washing them and coating them with olive oil and kosher salt, I roasted them face down on a large rimmed baking sheet.


Roasted potatoes are one of my favorite side dishes to serve with steak. I turned a couple of potatoes over so you could see how nice and crispy they got on the side that was face down. 


I used my favorite olive oil in this recipe -- 365 Extra Virgin Olive Oil from Whole Foods.  I like that it has a really mild flavor that doesn't overpower what I am cooking.  I use white balsamic vinegar because it doesn't change the color of your food. 


My daughters are addicted to feta cheese.  I knew they would like this recipe because it would give them an excuse to ask for more and more feta. 


I purchased my green beans from The Fresh Market.  Looking to make my dinner easy, I bought steam in the bag beans from the produce section.  My mom used grape tomatoes, but I decided to use a bag of San Marzano tomatoes. 


My whole family really loved this recipe. There were no grumbles from my daughters and my husband told me multiple times how much he liked it.

Roasted Fingerling Potato and Tomato Salad with Feta & Green Beans

Ingredients

10 fresh basil leaves -- chopped
3 T extra virgin olive oil + more for roasting the tomatoes
Juice from 1/2 lemon
1/2 T white balsamic vinegar
1/8 tsp coarse ground black pepper
2 garlic cloves -- smashed
1 package of fingerling potatoes -- 1 1/2 pounds
kosher salt -- about 4 pinches
1 small container of grape or San Marzano tomatoes
1 package of fresh steam in the bag green beans -- not frozen
Feta cheese crumbles -- to taste

Directions

In a small bowl, combine the basil, 2 T of olive oil, lemon juice, balsamic vinegar, and black pepper.  Whisk your dressing and set it aside.

Preheat oven to 450 degrees.

Wash and dry your potatoes before cutting them in half length-wise.  In a large bowl, toss them with 1 T of olive oil and 2 pinches of kosher salt.   Place them face down on a large rimmed baking sheet and roast them for 25 minutes until golden brown.  Do not turn them.

While the potatoes are cooking, wash and dry your tomatoes.  Place them in a small bowl and toss them with just enough olive oil to coat them.  Add a pinch of kosher salt and toss them again.  Place them on a small baking sheet covered in aluminum foil.  When your potatoes are cooked, put the tomatoes in the oven to roast for 5 minutes.

While your tomatoes are roasting, cook your green beans according to package directions, using the minimum suggested time for the wattage of your microwave.

Place your potatoes, tomatoes, and green beans in a large serving bowl.  Add the dressing (garlic removed), a pinch of salt, and feta cheese to taste.  Gently stir to combine.  Serve warm.


This recipe was inspired by a Bobby Flay recipe for Grilled Fingerling Potato Salad with Feta, Green Beans, and Olives.


Saturday, October 19, 2013

Mickey's Not So Scary Halloween Party

I have patiently waited 5 years to attend Mickey's Not So Scary Halloween Party (MNSSHP). My twins were only three years old when we moved to Orlando, and I did not want to take them to this special ticketed event until I thought they could stay up late enough and actually enjoy the festivities.  My girls did such a great job with the fireworks at the Magic Kingdom this summer, I decided this was the year to finally attend MNSSHP for the first time.  


We entertained ourselves taking selfies in the car on the drive to Walt Disney World.  I wore my cat ears and a black dress for MNSSHP.  I forced my girls to wear costumes, so I thought I should join in too.  MNSSHP starts at 7PM and ends at midnight, but you can use your ticket to get into the Magic Kingdom at 4PM.  We paid $62/adult and $57/child to attend the party.  On select nights, you can receive a military, DVC (Disney Vacation Club), or Annual Passholder Discount, but not the Friday night we chose to go. 


We used our MNSSHP ticket to get into the Magic Kingdom around 5:00 and headed straight to Columbia Harbour House for dinner.  This is the first time I have seen the new special diets menu.  I could choose from Amy's Mac & Cheese, Allergy Chicken Tenders, Grilled Salmon, or the Garden Harvest Salad with Chicken. I hope in the future that all Disney restaurants will have menus like this! 


When I go to Columbia Harbour House, I have to get the gluten free chicken tenders.  I have been enjoying this meal at the Magic Kingdom for the last 5 years.  I remember when they used to bake them for me and it took about 20 minutes to prepare.  Now, they are made in a dedicated fryer and only take an extra 5 minutes.  The chicken tenders and fries are also dairy, soy, and egg free.  They are the same price as the adult chicken nuggets we ordered for our daughters.  They had 8 nuggets compared to my 5 chicken tenders, but my gluten free chicken tenders were bigger.  I also ordered an OMG...It's Gluten Free Fudge Brownie.  I was a happy camper eating my delicious gluten free chicken tenders, fries, and brownie! 


After dinner, we headed over to the Haunted Mansion.  It has become a tradition to take a picture of my girls with the Haunted Mansion twins.  Only one of mine was cooperating with the frownie face I asked for.  Many of the cast members at the Haunted Mansion had on special make-up for MNSSHP. 


The only other attraction we rode before MNSSHP was Big Thunder Mountain Railroad.  I was hoping to ride it in the dark, but we were too busy trick-or-treating and watching the parade and fireworks.


I had to visit one of our favorite photo spots at the Magic Kingdom, the sleigh in front of Ye Olde Christmas Shoppe. 


After hitting some trick-or-treat locations and the trick-or-treat trails, we stopped in at Gaston's Tavern for some LeFou's Brew, which is gluten free and dairy free. 


Mickey's Boo-to-You Halloween Parade was so much fun!  We managed to snag some chairs at the top of the train station on Main Street to watch the parade and fireworks.  The parade starts off with the Headless Horseman, and he is amazing!!!  I was bummed I did not get a good picture of him!  


After the Celebrate the Magic show on Cinderella's Castle, the Happy HalloWishes fireworks spectacular started.  The fireworks rivaled Disney's 4th of July Concert in the Sky.  The music and the fireworks were amazing! I was shocked at how empty the park was at the point. 


There were long lines at City Hall on Main Street U.S.A. for most of the evening, but right before the fireworks started, I stopped in to ask about gluten free candy.  They provided me with a small bag of chocolate bats and pumpkins from Vermont Chocolates.  I was really impressed by the quality of the chocolate.  My daughters and I thought they were delicious!  


Here's a picture of the candy I received while trick-or-treating around the park.  Some of them appear on gluten free candy lists -- M&M's plain and peanut (I ate the peanut ones during the parade), Snickers, Laffy Taffy, Butterfinger, and Tootsie Rolls.  I was sad to see that the Peeps had a  "may contain wheat" statement on the package. 

So, is Mickey's Not So Scary Halloween Party worth it?  Absolutely!  I have been to the Christmas party twice, and this is by far the better event.  We loved the decorations, trick-or-treating, the parade, and the fireworks.  This is an event that should not be missed if you are in Orlando in September or October. 


Thursday, October 17, 2013

Creamy Garlic Chicken Pasta

There is a really good reason why I don't meal plan.  I want to eat what I am in the mood to eat on any given day, and meal planning puts a damper on that.  Plus, now that I am not teaching anymore, I have the flexibility and time to go grocery shopping every day.  Yesterday, I was going to make my quick cook chicken soup with beer bread or cornbread, but my daughters had been begging for pasta all week.  I knew I had to use the 2 chicken breasts I had in my fridge, so I put together this pasta dish, never having made pasta with a white sauce before.  I looked at some recipes online, became frustrated, and decided to wing it.  The result was pretty darn good, if I don't say so myself.  :-)


I cut my chicken breasts into small pieces, and sauteed them with garlic, olive oil, and  a generous amount of kosher salt. 


Monday, October 14, 2013

Homemade Granola

When I need a quick and easy breakfast, I love to eat yogurt with a 1/2 cup of homemade granola.  


It is easy to make, and can be stored at room temperature in an airtight container for a couple of weeks.  


I bake it right on my non-stick USA Pans jellyroll pan. I love all the products I have purchased from USA Pans, which are made in my hometown of Pittsburgh. 


My husband eats it in the morning like cereal, topped with milk and fruit.  He says it is better than any cereal he can buy at the store.

Homemade Granola

Ingredients

3 C gluten free oats (I use Trader Joe's Gluten Free Rolled Oats)
1 1/2 C pumpkin seeds/pepitas (raw/unsalted) or 1/2 cup each of pumpkin seeds, chopped pecans, and slivered almonds (all raw/unsalted)
1/3 C organic canola oil or another neutral flavor oil like grapeseed oil 
1/2 C maple syrup or honey (I use 1/4 cup of each)
1 tsp pure vanilla extract
1/2 tsp kosher salt

Directions

Preheat oven to 300 degrees.  

Mix all the ingredients together in a large bowl, then spread the granola evenly on a large rimmed baking sheet. 

Bake for 28 minutes, stirring once halfway through, until golden brown. 

When the granola is finished baking, stir it, and allow it to cool on the pan.  Continue to stir the granola every 3-5 minutes to break it apart as it hardens and cools.  Store it in an airtight container at room temperature. 


Recipe Notes

If you decide to use olive oil, use a very mild olive oil, not extra virgin, or the taste will be too strong.


I also love to eat granola on top of smoothie bowls.  You can view my smoothie bowl recipes here.  


Optional - Dried fruit can be added after the granola cools.  


I purchase all of my certified gluten free nuts, seeds, and dried fruit from nuts.com.